 I had President’s Day off and it has been quite a while since I’d spent some time away from the city so I decided to go camping in the mountains for the long weekend. I looked through the snowshoe routes in my Mountaineers guide and decided to hike up and camp near Hex Mountain, then spend the next day on Sasse Ridge.
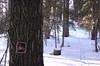
The guides say to start at Fire Road 116, which I believe is now Newport Creek Road. There is a turn off on the west side of Salmon La Sac Road where you can legally park. This area has been heavily developed though, and there are no signs directing you to the Hex Mountain trail head. Further, it’s on private property which is gated and signed no trespassing. A trip report indicates that this has been the situation for five years, with nothing built in the development in the interim. If I were to do it again, I would head up Corral Creek Road to Fire Road 118 looking for Trail 1340 to Hex Mountain instead. I saw a parking lot on the east side of Salmon La Sac requiring a forest pass on my way out, but I’m not sure what trail head access was there.
 There wasn’t enough snow to wear the snowshoes; it was neither deep nor consistent. With everything strapped to my nearly sixty pound pack, I locked the truck and headed up. I avoided the yellow gate at the head of the road with no trespassing signs, which turned out to be the right way when my road ended. I got out my GPS and headed through the woods toward the old FR 116 which was on my topo map. I’m sure a good number of the people who come out here to snowshoe Hex Mountain never get there as there were plenty of tracks wandering around the development in what turned out to be the wrong direction. I came across a couple more small roads, but I continued through the woods based on my maps. As I came up the other side of creek I heard some folks following me. When I got to FR 116 I sat and rested while the couple and there dog caught up and chatted for a bit. They thanked me for being prepared and said they had been wandering down dead end roads until they found my trail. Five years prior they had hiked this route to the peak of Hex but couldn’t remember the route through the development. I let them know the trail head was a few hundred feet up the road and they headed off.
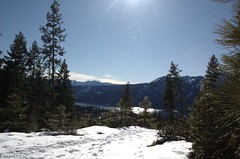
 At the time, the Hex Mountain trail head was marked with a sign and a rock in the middle of the road. I discovered coming down that you can stay on the road and it will switch back to join the trail again later on, which is a much less steep option than jumping on the trail here. The sign has a tree growing up the middle of it, but you can spot the trail if you’re expecting it. The climb was quite the slog with my pack. It’s been a long time since I made such a hike as well. Eventually I reached the ridge and turned toward the peak of Hex Mountain. By this time I had started using my trekking poles, but it wasn’t until I hit the peak itself that I could have used the snowshoes. I should have left my pack here on the ridge, but I hadn’t decided where I was going to camp yet and focused on summiting. Being out of energy, combined with the powder and the steepness of the peak made this quite difficult but I eventually made it. I dropped my pack and took a long breather. Eventually I put it back on one more time, accidentally losing a drink I was saving for camp and watching it slowly slide away down the steep peak covered in snow.
I found a small clearing just off the Sasse Ridge trail and set up camp there. 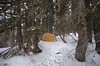 . It took a bit to get the tent all set up and everything unpacked. I was a little over-prepared and had expected a bit more snow. I checked a number of weather and avalanche forecasts before I left but hadn’t considered there was so little snow and didn’t look up the snow pack depth. I still had plenty of water but melted some and filtered it to boil for dehydrated dinner. I shouldn’t have bothered because the extra water mostly froze overnight. I had woke up pretty early that morning from excitement so I hadn’t gotten much sleep. Consequently I went to sleep shortly after sunset and slept about twelve hours through the night. Clearly needed, it sometimes takes being in the middle of nowhere out of touch for me to achieve this.
 The next day I got out of the tent and made breakfast a while after sunrise. I had forgotten how terrible plain oatmeal was and washed it down with instant coffee. My pack is secondhand off a friend and the day pack is still missing a buckle, so I emptied it out, packed the essential emergency gear, and headed off across Sasse Ridge. There was a few inches of powder on top of the frozen snow, which often prevented the snowshoes from gripping but there was enough that I kept them on all day. I got a kick out of the signs prohibiting motorcycles which were as frequent as any other trail indicator, which were rare and useless. I couldn’t imagine myself up here on my dirt bike, but I’m sure the landscape is completely different in the summer. I did see a trip report that mentioned hunters on dirt bikes out around Jolly Mountain, so I suppose it’s a problem.
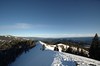
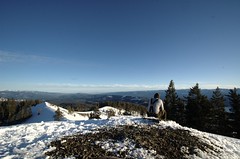
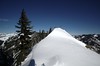
  For the majority of the trail you simply stick to the ridge. It climbs and drops a lot, producing some great views. However, the ridge gets quite narrow at times. With the snow, working around the peaks is quite difficult and I rarely considered it. At times the wind had blown the snow off the peaks and they were quite rocky. I wasn’t crazy about any of this. Eventually I found one I wouldn’t touch. I didn’t have the equipment or trailing to make it across this safely. Sasse Mountain wasn’t too far away, but I needed to turn around soon if I was going to make it back to camp before sunset.
 The trip back was easier because I no longer had to break trail so the snowshoes gripped much better now. I made a couple wayfinding corrects through a bit of a valley here and there, but stuck to my original route. When I returned to camp I made dinner, and did the usual chores. While I fell asleep quickly, I wasn’t as tired as the night before and woke up for a while. Listening to the wind at night is quite different than sitting on a peak staring out over the mountains during the daylight. Eventually I fell back asleep until daybreak. After better oatmeal and coffee in the morning, I packed up and headed back down, determined to keep to the trail better on the way out to get a good GPS track of it. The winds had picked up and the clouds marked an incoming front.
 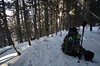 I had clear skies all weekend and was glad to be making it out before the weather arrived. Most of the way down the mountain I ran into a group of three hikers coming up. We chatted for a minute, I got pegged as a Canadian and we laughed about Maine being pretty Canadian. I have French Canadians on both sides of my family so it’s actually not that far off.
It was a great trip, but I wouldn’t do the same route again. As I mentioned, the development at the base of the Hex Mountain trail is confusing and uninviting. The peaks on Sasse Ridge were uncomfortable under the conditions. Besides, there is an amazing amount of backcountry in the Wenatchee National Forest, and all across Western Washington to be explored. I haven’t been camping enough since I moved to Seattle, hopefully much more will follow.